
Appearance
Team and roles
A workspace can be one agent or a whole team. This page covers the four roles, inviting people, and the team pages.
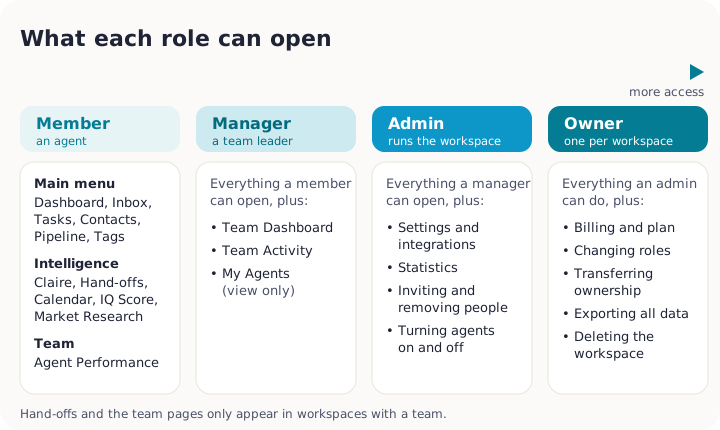
The four roles
| Role | What they can do |
|---|---|
| Owner | Everything. Only the owner can manage billing, change people's roles, transfer ownership, export all data or delete the workspace. |
| Admin | Everything except billing and ownership. Admins open Settings, connect integrations, invite and remove people, and change who sees which contacts. |
| Team Lead | Runs a team. Sees the team dashboard, team activity and leaderboards, and compliance tools such as the suppression list. Sees contacts, the roster, the leaderboard and the team list only for their own team and the teams they lead. Can't open Settings. This role used to be called Manager. |
| Member | An agent. Works their own contacts, conversations, tasks and appointments. Can't open Settings, except Notifications, which holds their own alerts. See Where each alert reaches you. |
Which contacts each person sees also depends on your contact visibility setting. See Who sees which contacts.
People who join now start with fewer permissions
Agents and team leaders who join your workspace start with only a few permissions switched on. Admins start with all of them switched on. Until more are switched on for an agent or team leader, they may not be able to add or edit contacts, or invite and remove people, even though their role allows it. Owners and admins can see and change each person's switches on Team, Permissions. If a teammate is told their permissions don't include an action, check there or contact Yapii (see Getting help).
Transactions: apply an Open To Close role
If your workspace has Transactions, an owner or admin can switch on the right permissions for a teammate in one step. Open Permissions under Team in the left menu and click the person. Under Apply an Open To Close role, choose a role, then press Preview. Yapii lists what it would turn on. Press Turn on to apply it. It only adds switches, never turns one off, and never changes the person's role. A switch the person's role cannot use is left off and listed with the role it needs. Changing someone's role stays a separate decision for the owner.
Inviting someone
Owners, admins and team leaders
Invitations are sent from the Team page. A person who leads a team can also invite people, but only as members and only into a team they lead.
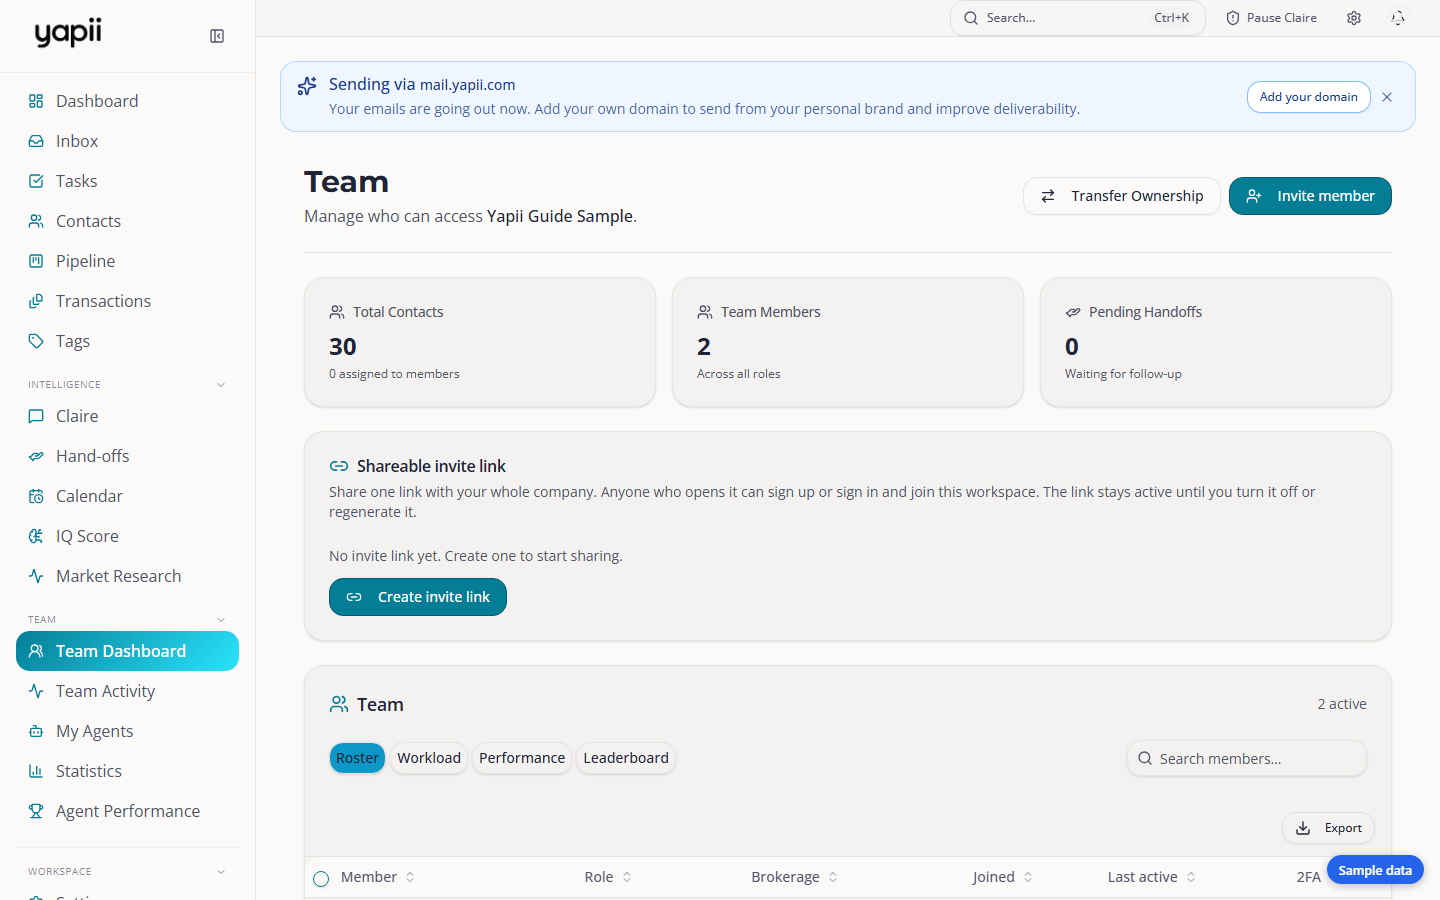
- Open Team Dashboard from the Team row of the sidebar.
- Press Invite member. The box is called Invite a teammate.
- Enter the person's email address. A team leader also picks the Team the person will join. Owners and admins choose their Role.
- Owners and admins can tick Give them their own phone number. It is set up when the person accepts, they call and text from it, and replies come to them. You can type an Area code if you want one. It is billed to your workspace each month unless the person holds a paid seat, which includes it. See Phone lines.
- Send the invitation.
Under the role, the box adds a line about the Transactions files that role can open. An owner, admin or team lead sees every file in the workspace. A member opens only the files where they are named as the Listing agent or Buyer agent. The join link shows the same line beside the role it gives. See Before you start.
A team leader sees only their own team's invitations on the Team page, and can resend or cancel those. They do not see another team's invitations. When the person accepts, they join the team the invitation named.
The invitation lasts 7 days. From the Team page you can resend it or cancel it. Sending a new invitation to the same address cancels the old one.
Once your sending domain is verified, invitations come from your own domain, in the name of a sender set up on it, or otherwise in the workspace owner's name. Until then, they come from a Yapii address. If your workspace can't send email yet, the invitation waits and goes out as soon as it can.
Seats
Each plan includes a number of seats: Operator 1, Builder 10 and Expansion 30. Extra seats can be added on any plan. An older plan on an existing account can include a different number; Settings, under Billing, shows yours. See Plans, billing and credits.
Invitations that haven't been accepted yet also use a seat. If you can't invite anyone, your seats are full: cancel an old invitation, or the owner can add seats or upgrade.
When the seats are full, Yapii says so where you can see it. Invitations waiting to go out, for example because your sending domain is not verified yet, count toward the seats too. Resend is refused with the reason instead of emailing a link nobody can use. If someone opens an invitation to a full workspace, they are told the workspace is full, that nothing is wrong with their account, and to ask the person who invited them.
A join link
Instead of inviting people one by one, an owner or admin can share a join link: a link anyone can use to sign up or sign in and join the workspace. They sit on the Team Dashboard, on the Shareable invite links card, and every link still respects your seat limit.
Every workspace always has four standing links, and each shows a chip for what the person becomes:
- Member (Joins as Member) and Admin (Joins as Admin).
- ISA (Joins as ISA): the person joins as a member and is marked on the ISAs card.
- Lender (Joins as Lender): the person joins as a member and is marked on the Lenders card.
You can add more with Add link. Name it, for example Open house or Recruiting, pick Member or Admin, and set an expiry date if you want one. The expiry is optional. A link you added can be deleted with the trash button. The four standing links can only be switched off or regenerated.
Each link has its own switch and shows Live, Off or Expired, how many people have joined through it, and the day it expires. Regenerate gives it a new address, turns it back on, and the old address stops working. An expired link admits nobody. Only the owner can manage a link that makes people admins, and only the owner sees Admin as a choice when adding one. Admins see those links with the controls turned off.
Changing someone's role
When a role is changed from the person's row on the Team page, the person's permission switches follow the new role, so they are not left with the switches of the old one:
- Moving up, for example from member to team lead or admin, turns on the switches the new role starts with that the person does not have yet. It never turns one off, so a switch an owner added by hand stays.
- Moving down asks you to confirm first. The box says that switches above the new role's defaults will be removed from this person, and Change role confirms it. It turns off the switches the new role does not hold and adds none, so a switch an owner already took away stays off.
- A person whose switches were never changed from their role's defaults has nothing to adjust, because the role decides.
Accepting an invitation
Click the link in the invitation email and sign in, or sign up, with the email address the invitation was sent to. If you use a different address, Yapii won't match you to the invitation.
If that address already has a Yapii account, for example because you belong to another workspace, the link takes you to sign in instead of sign-up, so you do not run into "an account with this email already exists". Sign in with your existing account. You land in the workspace you were invited to, not in the one you use most.
Start from the link in the email. If you instead type the address into the sign-up page yourself, Yapii does not add you to the team until that address is verified, so that nobody can join a workspace just by guessing an email address. Signing in with Google or Microsoft counts as verified. When you do join, you land in the team's workspace, not in a separate empty one of your own.
When an invitation cannot be used
If someone signs up with the address you invited but the invitation can't be used, Yapii gives them a workspace of their own so they can still sign in, and tells both of you with a notification:
- The invitation expired. They are asked to have you send a new one, then use the link in that email. You are told to send a new invitation from the Team page.
- The workspace has no free seats. They are asked to have the owner free a seat. You are told to free or add a seat. The invitation stays pending and its link works once there is room.
- An owner invitation that an owner didn't send. Only an owner can invite another owner. Ask an owner to send it again.
Changing roles and removing people
- Changing someone's role: owner only, on the Team page.
- Removing someone: owners and admins, on the Team page. Admins can't remove the owner, nobody can remove themselves, and the last owner can't be removed. Contacts assigned to the person who left go back to the owner, and the owner is notified.
Teams and Team Leaders
The Team role above is about what someone can open. Teams are different: they are the groups that decide who receives new leads, hand-offs and appointments. The owner manages them in Settings, under Team & Roles, where you can add a team, set its states, tick who is on it, and sync them from Follow Up Boss.
While you edit a team, a star appears beside each person who is on it. Click it to make that person the team's Team Leader. A Team Leader sees every contact assigned to or created by anyone else on the team, on top of whatever they could already see, whichever contact visibility setting you use. Click the star again to remove it. Taking someone off the team also removes their star. The team's summary lists who leads it.
Teams within teams
A team can sit under another team, such as a Utah team under a Western region team. While you edit a team, pick the other team in the Parent team box, or leave No parent team (top level). The list of teams is then drawn as a tree, with each team under its parent. Teams you made before this keep working as top-level teams.
A parent team's Team Leader also sees the leads of every team under it, however many levels down. It only goes down: a leader never sees a team beside theirs or the team above. A leader also runs the teams beneath their own. See Running your own team.
Yapii will not let a team sit under itself or under one of its own sub-teams. A team that is switched off or removed stops the reach at that team: its members, and every team under it, are no longer seen through it. Syncing teams from Follow Up Boss does not bring over Follow Up Boss's nesting and never changes a parent you set, so set parents in Yapii.
Running your own team
A Team Leader does not need to be an owner or an admin to run their team. If the workspace has more than one seat, every person sees a Teams link in the Team row of the sidebar. It opens the Teams page. An owner or admin sees every team there. A Team Leader sees the teams they lead and the teams beneath them. Anyone else sees the teams they are on.
On a team they lead, or on a team beneath it, a Team Leader can:
- add a team beneath it with Add Team, and rename a team with the pencil beside its name;
- add people with Add Team Members, and take people off with Remove;
- turn on Can Export, Record Calls and Pause Leads for the people on the team;
- delete a team beneath theirs. They cannot delete the team they lead themselves.
Add Team Members has a box called Or add by email. Paste email addresses, or press Import a CSV to load a file. Yapii finds every address in what you paste. Someone who is already in the workspace joins the team at once and does not use a seat. Anyone else is sent an invitation that puts them on the team when they accept. After you press the button, Yapii says how many were added, how many were invited and how many were already on the team. If an address cannot be invited, a message names it and why. Being on a team never uses a seat.
Open a team, or All team members, to see its table of people. A filter row sits under the column headings. Type in the first box to find a person by name, email or phone. The other columns have menus: Role, Last Seen (Past 7 days, Over 30 days or Never), Can Export, Team Leader, Record Calls and Pause Leads, each Any, Yes or No. Team Leader is left out on All team members. The filters only narrow what you see. They change nobody's settings, and the count in the heading still shows everyone. Clear appears when a filter is on. If nobody matches, the table says No one matches these filters.
On All team members, owners and admins also get a trash button on each row, Remove from workspace. It takes the person out of the whole workspace, not just one team. It asks first, and the box has Give their contacts to, which starts on The workspace owner (default), then Remove member. You cannot remove yourself or the owner.
A Team Leader cannot do the things that decide where leads go. These stay with owners and admins:
- choosing the states a team covers, and switching a team on or off;
- naming who leads a team;
- changing who is on a team that routes leads by state;
- the Follow Up Boss sync.
A team outside a leader's own teams does not show up for them at all.
Owners and admins can switch on Pause new leads for any person. A paused agent gets no new leads from routing rules or groups, still signs in, and keeps their contacts. The Team page shows Paused or Taking leads beside each person. See Lead sources and routing.
Turning Claire on or off for one person
Owners and admins can decide whom Claire works for. In Settings, open Claire, then the Lead routing tab, and find the Who Claire works for card. It has one switch for each person, marked on or off, and everyone starts on. Use Search by name or email, the role buttons, All on and All off to work on many people at once. A line under the search says Claire works for everyone. or how many people she is off for. Turning someone off asks first, in a box titled Turn Claire off for the person's name, and Turn Claire off confirms it. You can turn her back on at any time. Texts and calls you make yourself are never affected. See Approving, pausing and taking over.
Syncing one teammate's leads from your CRM
Owners and admins see a Sync leads by member card on the Team page for each connected CRM that can pull one agent's leads. Today that is Follow Up Boss and BoldTrail. A CRM that cannot do it shows no card. The card pulls one teammate's leads out of the CRM now, so you do not have to wait for the next background sync. Their leads arrive assigned to them. It is a one-time pull: it does not change what the background sync imports. Press the card's title to open or close it, and use Search members to find a person by name, email or CRM agent. The list scrolls when the team is long.
The CRM is connected once, for the whole workspace. Nobody saves a personal API key, and the card uses the workspace's own connection for everyone. Each person shows one of two badges:
- Linked: the person is matched to a CRM agent, usually by email or name. Their leads are pulled through the workspace's connection.
- Not linked: no match yet. Pick an agent under Or link to a (your CRM's name) agent and press Link. Linking is for a teammate whose CRM seat uses a different email address.
Press Sync leads on a person's row. A large book comes across in several short steps, with running totals on the row. If it stops, what already came across stays. Sync leads also brings back that person's leads that someone had deleted in Yapii, and the result says how many it brought back. Leads you merged into another contact stay merged. The button is off while contact syncing is paused for the workspace.
Lenders
The Lenders card on the Team page lists the teammates who can be named as a contact's lender, with a count such as "2 lenders". Naming someone as a lender on a contact also lets that lender see the contact. The card says a lender sees only the contacts assigned to them, and loses a contact when the lender is cleared from it. Any teammate can be marked a lender, and the standing Lender invite link joins a new person already marked.
The card lists only the people you have chosen, never the whole team. To add one, use Add lender and search for the person. Remove a lender with the remove button on their row. Both save at once, with Saved and an Undo. Taking someone off the list leaves the contacts that already name them alone. They just can't be named on new contacts. Once there are more lenders than fit, the card pages through them and adds a Search lenders box. Owners and admins can change the list. A team lead sees it with Add lender and remove turned off, and the reason in words.
ISAs
The ISAs card sits beside the Lenders card. ISAs qualify and book leads rather than list homes, so the state license rule does not apply to them. A teammate marked here can claim a hand-off from any state, and with pond access is in line for hand-offs from every state. Their role and what they can see do not change. Any teammate can be marked an ISA, and the standing ISA invite link joins a new person already marked. The card works like the Lenders card. Owners and admins can change it, and a team lead sees it read only, with the reason in words.
Report export
The Report export card on the Team page is for owners and admins. It decides who besides owners and admins can export reports, and it lists only the teammates who have that permission, with a count. While nobody has it, the card says "Only owners and admins can export reports. Add a teammate to let them export too." Use Add exporter and search for the person. Remove someone with the remove button on their row. Owners and admins can always export, so they are never offered. A teammate who is added sees Export on the Reporting pages (see Exporting a report to a spreadsheet), and their file holds only what their own report shows them. The permission lets a file leave. It does not widen whose rows someone sees. Nobody has it to start with.
Handing the workspace to someone else
The owner can transfer ownership in Settings, under Danger Zone. Enter the new owner's email and confirm. The previous owner becomes a Member, and both people get an email.
The team pages
| Page | Who sees it | What's on it |
|---|---|---|
| Team Dashboard | Owners, admins and team leads in team workspaces | Everyone on the team, invitations, each person's workload, performance and a leaderboard. |
| Team Activity | Owners, admins and team leads in team workspaces | A feed of what people and Claire have done, filtered by person, type and date. |
| My Agents | Owners, admins and team leads in team workspaces | Yapii's AI helpers (not people): what they're set up to do and anything waiting for approval. |
| Reporting | Everyone | Every report in one place: activity, calls, texts, emails, deals, appointments, the leaderboard and goals. Each person sees only the reports whose data they may read. See Reporting and Agent Performance. |
Each person's connected email
On the Team Dashboard, owners and admins see a Connected Email column in the table of people. It shows the address of the Gmail or Outlook mailbox each person has connected to Yapii, or Not connected when they have none. If a mailbox has stopped working, its address shows with Needs reconnecting under it, and that person needs to connect it again. The column is also in the file you get when you download the table. Team leads and members do not see it.
Each person's phone number
Owners and admins also see a Phone column. It shows the phone number each person saved on their own profile, or a dash when they have none. It is also in the downloaded file, and team leads and members do not see it. The table has a Last active column too, which shows how recently each person was active in Yapii.
Each person's connected MLS
Everyone on the team sees a Connected MLS column in the table of people. It shows the MLS name and MLS ID each person saved in the Personal Info card on their own Profile. It shows a dash when they have not filled it in.
Each person's calling settings
Below the table, owners and admins see a Calling settings card. It has one row per person, 50 to a page, and you can show 10, 25, 50 or 100 at a time. Each row has two choices and a test:
- Outbound caller number is the number that shows as the caller ID when that person calls from Yapii. The list has Workspace default, plus the workspace's own numbers that the person is allowed to call from: their own number, a company line they may use, or a line on an inbox they are on. Pick Workspace default to go back to the usual choice.
- Ring time (seconds) is how long their phone rings, from 5 to 60. Leave it blank to use the inbox's ring time. A person's ring time applies when they are the only one an inbox rings. When an inbox rings several people, the inbox's own ring time applies.
- Test call rings the person's own saved phone, so they can hear it. Yapii says Test call placed, and the call plays a short test message. It needs a phone number saved on their profile, and Yapii limits how often you can run it.
Press Save on the person's row to keep your choices, and Yapii says Calling settings saved. A ring time outside 5 to 60 is refused with Not saved. The settings apply to real calls. They do not change call recording or consent. Team leads do not see the card.
Each person sees their own settings, read only, on their Profile, under Your calling settings. It says they are set by an owner or admin and shows the outbound number and ring time, with a Test call button they can press themselves.
If you belong to more than one workspace
Use the workspace switcher at the bottom of the sidebar to move between them. Each workspace keeps its own contacts, settings and billing.