
Appearance
Your sending domain
A sending domain is the web address your email comes from, for example mail.smithrealty.com. With one set up, your email shows your own brand and has a better chance of reaching the inbox.
Owners and admins
Sending domains are managed in Settings, under Email & Sending.
Why it matters
Until you add one, Yapii sends your email from its own shared sending domain. That works from day one, but:
- It doesn't carry your brand. Your own domain shows contacts the email is really from you.
- It builds your own reputation. Email services such as Gmail and Outlook decide whether to deliver an email partly on the reputation of the domain it came from. With your own domain, that reputation is yours.
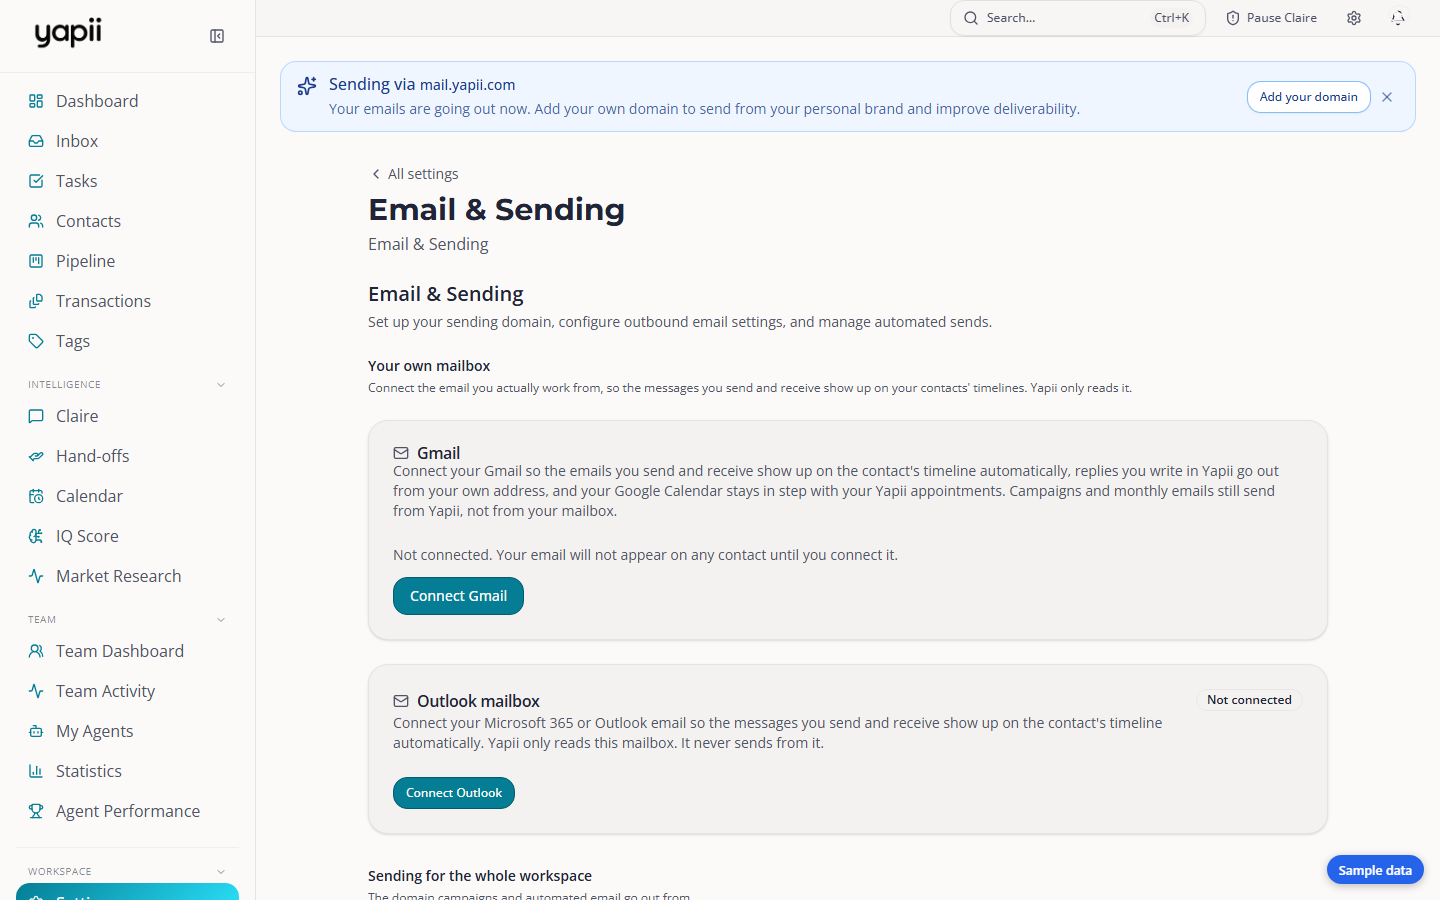
Until you add one, the workspace owner sees a banner, Your emails are going out from a Yapii address. Click Add your address to come to the Sending domains card, or Full guide to open this page. You can close the banner if you're not ready yet.
Before you start
- Use a subdomain, not your main domain. For example
mail.yourbrokerage.comrather thanyourbrokerage.com. If something ever goes wrong with bulk email, your everyday email on the main domain stays safe. - Know where your domain's DNS is managed, for example GoDaddy, Cloudflare or your web host. See Where the DNS records go if you are not sure.
- Verify your own email address first. You can't add a domain until you have.
- Check your limit. Your plan sets how many sending domains you can have. Yapii tells you on the Sending domains card when you've reached it.
Adding a domain
Open Settings, then Email & Sending, and go to Sending domains. At the top, choose how to set it up:
- Automated (marked Recommended): Yapii publishes the DNS records for you. Use this if your domain's DNS is managed at Cloudflare.
- Manual: you add the DNS records yourself where your domain is managed. Use this if your domain's DNS is managed anywhere other than Cloudflare, including GoDaddy.
Automated
- Under Cloudflare API token, the workspace owner connects your Cloudflare account with an API token that can edit DNS. See Creating a Cloudflare API token below. Until a token is connected, the Root domains section below it stays locked.
- Click Add root domain. Automate DNS via starts on Manual (no automation): change it to Cloudflare. Then choose your main domain, for example
yourbrokerage.com, from Select a Cloudflare zone… and click Add. - Yapii creates a sending subdomain under that domain and publishes its records on its own. If nothing appears, click Auto-create a subdomain under your domain.
You can add more than one root domain. New sending subdomains are always created under the one marked Main.
Manual
- Type the full address, for example
mail.yourbrokerage.com, and add it. - Yapii shows a handful of DNS records. Add them where your domain's DNS is managed. Under Which DNS provider do you use?, pick yours for its own step-by-step guide. The steps start on general instructions that suit any provider, and change to the provider's when you pick it. Next to the steps, Open followed by the provider's name and DNS settings opens the page where records are added, in a new tab. Sign in if asked. It opens the page for your main domain, so
mail.yourbrokerage.comlands on the page foryourbrokerage.com. A few providers have no such link, and their written steps stand alone. - Click Check now. Checks usually pass within 5 to 30 minutes, but can take up to 48 hours. Yapii also keeps checking on its own.
- A checklist of seven steps shows where you stand, from naming your DNS provider to Sending domain ready. Each step reads Done, To do, In progress or Recommended. When the domain shows as verified and every SPF and DKIM record is found, the verified banner appears and you're done. DMARC configured is only recommended, so it never holds that banner back. Yapii emails the owner when it goes live.
Where the DNS records go
Three different jobs keep your domain working, and they can be three different companies:
- Email hosting runs your inboxes, for example Google Workspace or Microsoft 365. It usually does not hold your DNS records.
- Domain registration is the company you pay for the name, for example GoDaddy, Namecheap or Squarespace.
- DNS hosting is whoever's servers answer for your domain. The records go here. It is often the registrar, but not always.
Records only count at the DNS host, so adding them at the registrar or in your email host's console does nothing if they are not the DNS host. In the setup steps, Find where my DNS is managed looks it up for you. When it can name the provider, it says "Your DNS for" your domain "is managed at" that provider, and Use followed by the provider's name picks it. If the lookup cannot match a provider it knows, or cannot read the domain, it says so. Then ask whoever manages your website or domain where the DNS is hosted, or pick Other and use the general steps.
Google Workspace is in the provider list too. It is your email host, not usually your DNS host, so its steps help you find who does manage your DNS (in Google Workspace, under Domains, then Manage domains) and what to ask a reseller or host that keeps the DNS for you.
What a domain's status means
Each domain on the Sending domains card shows where its setup is:
| Status | What it means |
|---|---|
| Pending DNS | Yapii hasn't found the DNS records yet. |
| Partial | Some of the records are in place, for example Partial - 2 of 4 verified. Add the rest. |
| Verified | Every record is in place. |
| Failed | The records never verified. Check them against what Yapii shows, then click Check now. |
Once a domain is verified, a second badge shows how it's sending:
| Status | What it means |
|---|---|
| Warming up | The domain is new and its daily limit is still growing (see below). |
| Halted | Yapii has stopped sending from the domain to protect it, for example after too many bounces or spam complaints. Nothing goes out from it until the problem is dealt with. See What happens to your email while a domain is halted. |
What happens to your email while a domain is halted
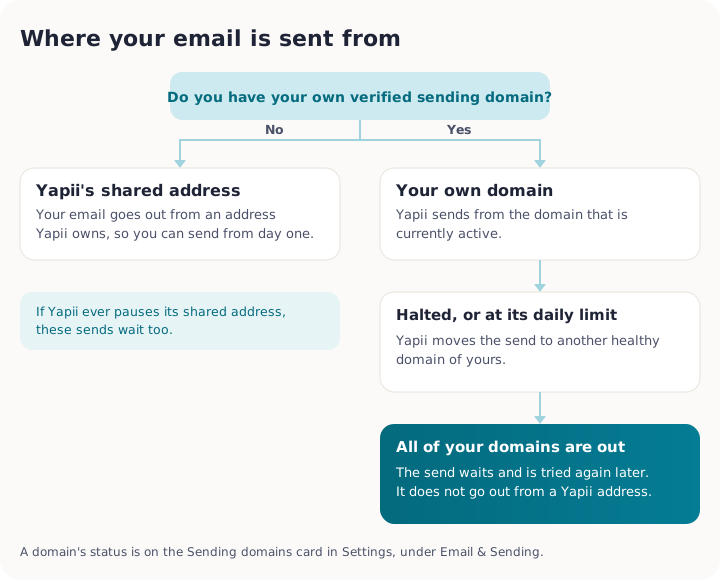
Your email does not quietly go out from Yapii's shared sending domain instead. Once Yapii is sending from your own domain, it only sends from a domain you own:
- If you have another healthy domain, Yapii sends from that one instead.
- If every one of your domains is halted, or has reached its daily limit, your email waits and Yapii tries again later, rather than going out from a Yapii address.
This is on purpose. Your domain's reputation is yours, and the shared address is used by other Yapii customers, so a problem on your domain is not passed on to them.
Creating a Cloudflare API token
You only need this for the Automated setup, and only if your domain's DNS is managed at Cloudflare.
What it is. An API token is a key you create in your Cloudflare account. It lets Yapii add the email settings (DNS records) for your domain there, so you don't have to copy them by hand. You choose what the key can do, and you can delete it in Cloudflare at any time.
Use an API token, never your Global API Key. Cloudflare also offers a Global API Key, which can change everything in your Cloudflare account. Yapii never needs it and you should never paste it anywhere.
- Sign in to Cloudflare at dash.cloudflare.com. Click your profile icon, then My Profile, then API Tokens.
- Click Create Token, then choose Create Custom Token.
- Give it a name you will recognize, for example
Yapii email. - Under Permissions, set the first line to Zone, DNS, Edit. Click Add more and set the second line to Zone, Zone, Read.
- Under Zone Resources, choose Include, Specific zone, and then your domain. This keeps the token limited to that one domain.
- Click Continue to summary, then Create Token.
- Cloudflare shows the token only once, so copy it straight away.
- In Yapii, open Settings, then Email & Sending, then Sending domains, and choose Automated. Paste the token into the Cloudflare API token box and click Connect. Yapii checks it on the spot. After that, only its last four characters are ever shown.
If Yapii says the token doesn't work, check that both permissions are there and that your domain is picked under Zone Resources. If you lose the token, create a new one and click Update token in Yapii.
Yapii also walks you through these steps the first time you open Automated. You can skip it, and bring it back with Show me how.
These steps were last checked against Cloudflare on September 21, 2026. Cloudflare sometimes renames things; if a button looks different, the permission names above are the part that matters.
Key activity
Under the Cloudflare API token box, owners and admins see Key activity: a list of every time Yapii used your stored token, newest first. Nobody else sees it. Use it to check that the token is only doing what you expect.
Each entry says what Yapii did, such as Added a record, Changed one, Removed one or Looked up the records for a name, with the record's type and name. It never shows the token itself or what a record says. Under that line you get the date and time, who did it, and whether it ran on the Yapii app server or in a Yapii background job. Who is either a team member's name or Yapii, automatically, with the check that ran it in brackets, such as the regular sending domain check or the check that runs right after a domain is added.
If Cloudflare refused, or could not be reached, the entry says so in red: Cloudflare said no with its error number, or Could not reach Cloudflare. The list shows seven entries at a time, and Show older brings up the next page. Until Yapii has used the token it says Yapii hasn't used your key yet. If you have not connected a token, the list only shows up once there is something earlier to show.
New domains start slowly
A brand-new domain has no reputation yet, so Yapii sends a limited amount from it at first. Each domain has its own daily limit, and Yapii adjusts it on its own once a day:
- after a clean day, with enough email sent and few bounces or spam complaints, the limit goes up by a quarter;
- after a bad day, with too many bounces or complaints, the limit is cut in half.
This protects the domain. Your mail still goes out in the meantime.
Troubleshooting
The domain won't verify.
- Wait: DNS changes can take up to 48 hours.
- Check each record was copied exactly. Many DNS panels add your domain name to the end of the host automatically, so you may only need the first part.
- On Cloudflare, every email record must be DNS only (gray cloud), not proxied (orange cloud). If one is proxied, the Email Deliverability card in Settings, under Email & Sending, names it.
I typed the domain wrong. Domains can't be renamed. Remove the wrong one and add the right one.